Quick answers, network status, and the fastest way to reach a real person. We pick up Mon–Fri 9am–5pm for sales and accounts, and 7 days 8am–8pm for support.
Quick step-by-step fixes for the most common issues. Click a guide to expand.
For wireless customers only. If you're on fibre, your setup uses an ONT (optical network terminal) supplied by Chorus, not a POE injector — please call us if you're having trouble with your fibre connection.
Your wireless setup has an external antenna or dish on your roof that connects to our network. Inside the house there's a POE injector (small box that powers the antenna) and a router (typically TP-Link branded if we supplied it). Use this guide to make sure everything's connected the right way.

POE and LAN, and a power cable.

POE port on the front of the POE injector.
LAN port on the POE injector, and the other end into one of the orange/yellow ports on the back of the router.
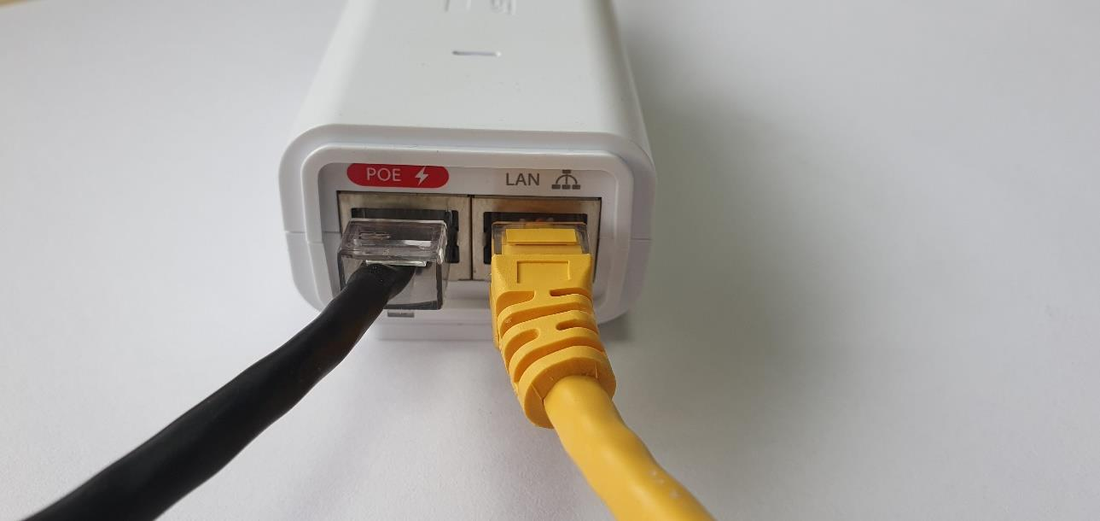
POE, yellow ethernet in LAN.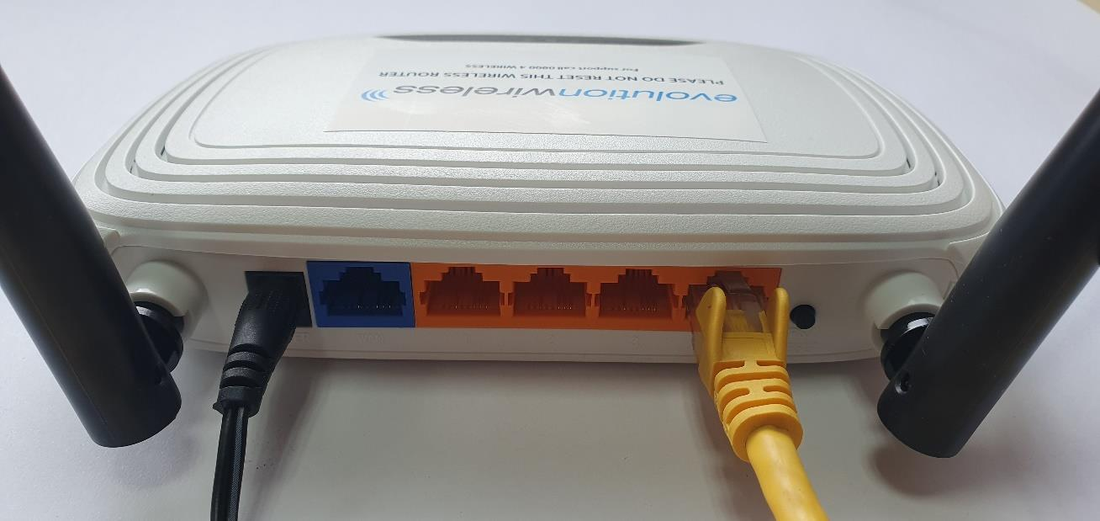
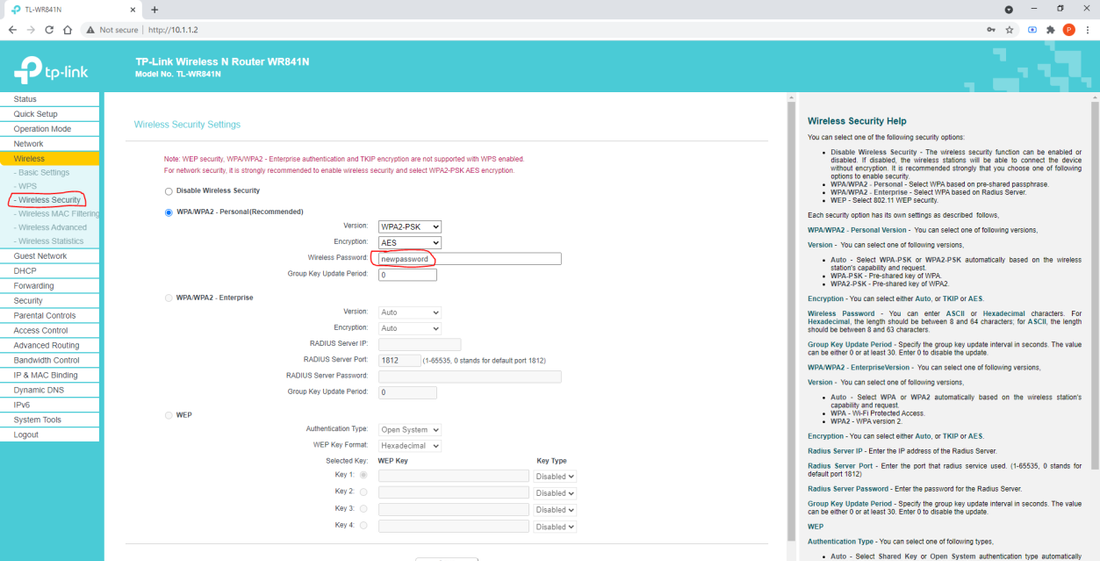
If we supplied your router, it's a TP-Link and you can change the WiFi password yourself. You'll need a device that's already connected to the WiFi (or plugged in by ethernet).
10.1.1.2 and press Enter.admin / password adminadmin / password admin1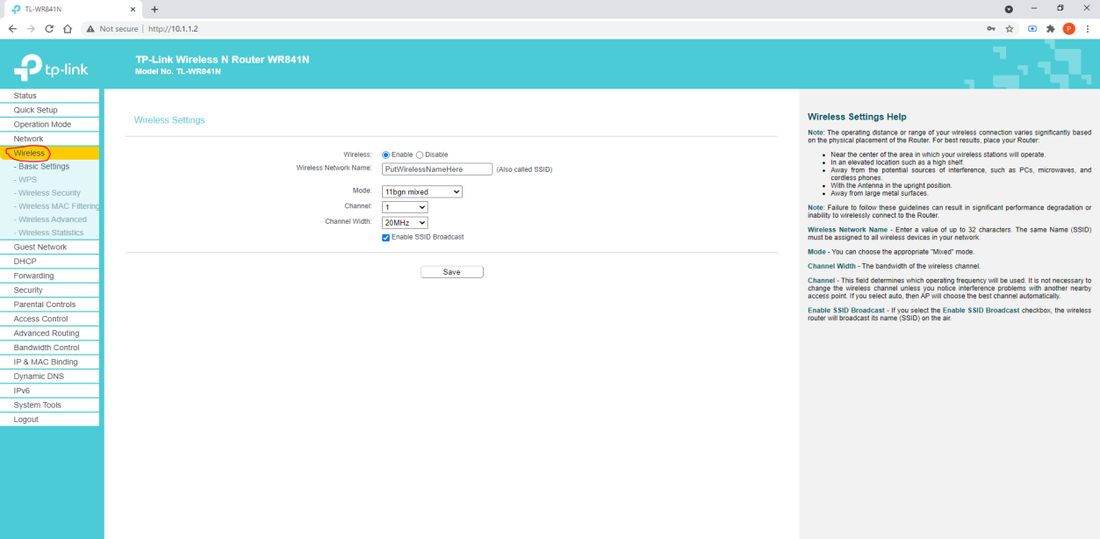
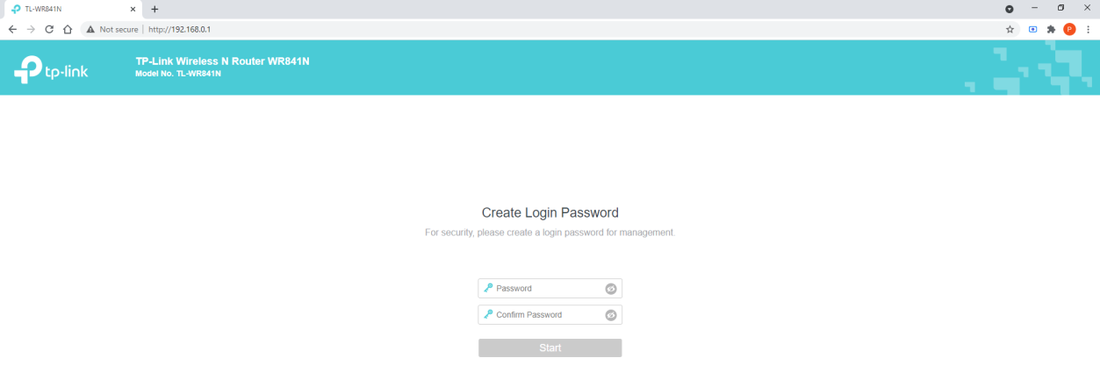
If your TP-Link router has been factory-reset (someone hit the reset button, or it was unplugged and reset itself), you'll need to set it up again to work with our network. This guide walks through the full setup.
Connecting your device
Configuring the router
192.168.0.1 in the address bar.admin1 by default. Type it twice, then click Start.
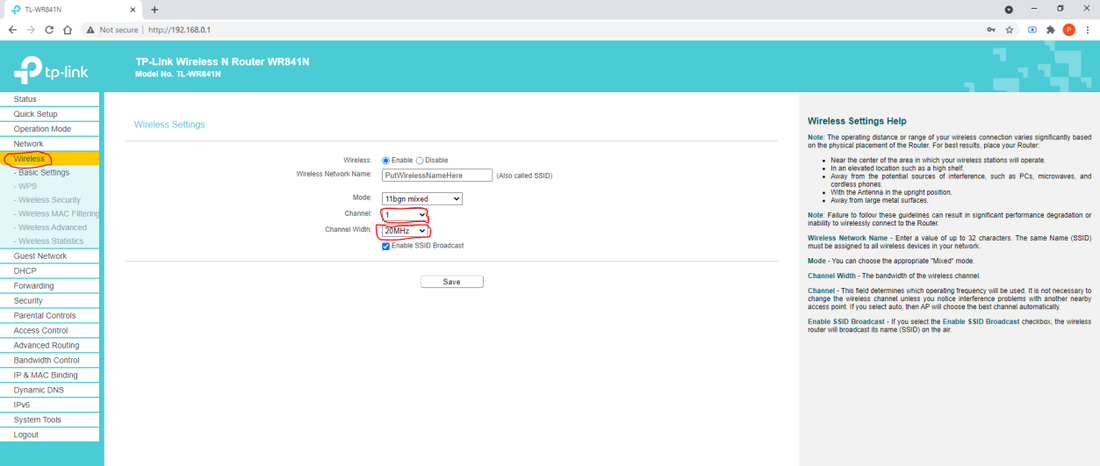
Smith Family WiFi).1, 6, or 11.20MHz.

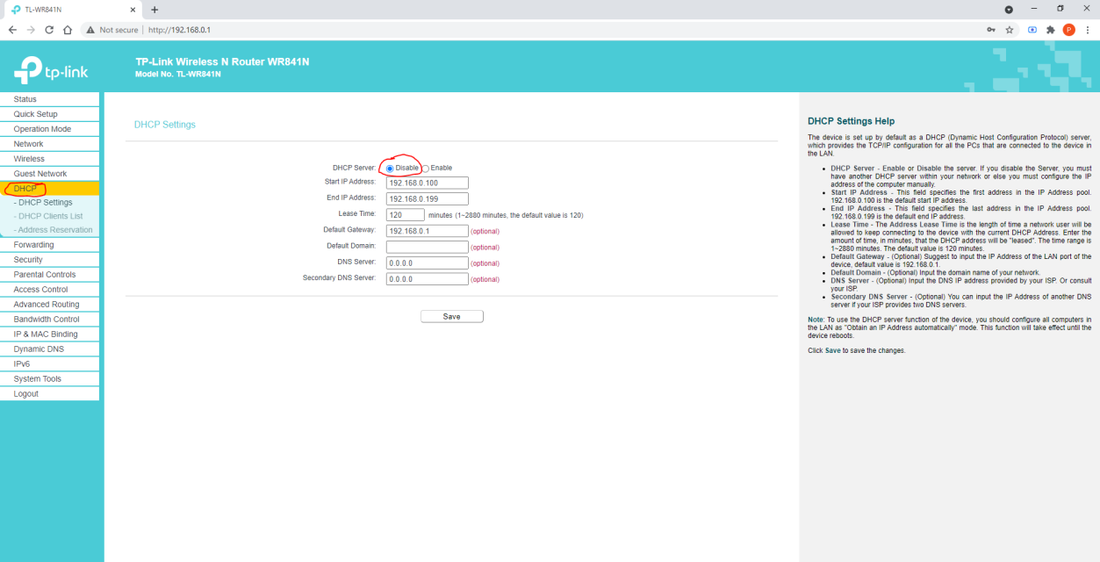
10.1.1.2. Click Save.

LAN port of your POE injector into any of the orange ports on the router.POE port (next to the LAN port).Most common stuff first. Click a category to filter, or scroll the lot.
Send us your address through the contact form or call 0800 4 WIRELESS (0800 494 735). We check what's available at your place — fibre, wireless, or both — and come back with a recommendation.
No contracts, no setup fees for standard installs, and you can change plans whenever.
We recommend one, yes — for both fibre and wireless connections. We can sell you a pre-configured router or you can use your own.
Monthly, in advance, by invoice — payable online or at your bank. Your first invoice covers just the days you're connected in the current month, so it's typically lower than a standard monthly charge. Every invoice after that is the regular monthly amount.
Invoices arrive at the end or start of each month, delivered by post or email depending on your preference at sign-up.
Yes. Want to upgrade? We'll switch you over straight away and pro-rate the difference. Going down a plan? We'll set it up to kick in at the start of your next cycle. Either way, drop us a line and we'll sort it.
For now, give us a call on 0800 4 WIRELESS or send us a message. We're building a customer self-service portal that'll let you update payment, see invoices, and check usage — coming later this year.
We'll email a reminder before doing anything. If we can't sort payment after a couple of weeks, the service may be slowed or paused — but we'll always try to talk to you first. Things happen. Just give us a ring on 0800 4 WIRELESS and we'll work something out.
Yes — top-ups are $15 for 20GB. Just send us a message or call 0800 4 WIRELESS and we'll add it to your account. The top-up applies to your current billing cycle.
The boring-but-effective routine, in order:
If you're on a data-limited plan (Wireless 80 or Wireless 120), check your usage page first — once you hit your monthly allowance, speeds are throttled to 1 Mbps until the next billing cycle.
Run a speed test at fast.com on a wired connection (Wi-Fi can knock 30–50% off). Test at a quiet time first, then again at 7–9pm if you suspect peak congestion.
What to expect:
If you're consistently below half your plan speed wired, that's worth us taking a look. Send us a fault.
That's almost always a Wi-Fi issue, not an internet one. Quick checks first:
For larger homes, multi-storey places, or stubborn dead spots, a proper mesh setup is the real fix — multiple access points covering every corner, one network name, no dropouts as you move between rooms. We sell and install whole-home mesh wifi using Grandstream gear (same kit we use in commercial deployments). Get a quote and we'll size it for your place.
Head to the usage page from your Evolution Wireless connection, and you'll see your current month's usage automatically. If you're on an unlimited plan, you don't need to worry about it — but the page works for everyone.
VoIP rides on your internet, so first check that's working. If it is, try these:
Still nothing? VoIP is provided by 2talk, so phone faults are best raised with their support team direct — they've got visibility into the line. Call 09 281 4357 (Mon–Fri 9am–5pm) or open a ticket via the 2talk support portal. If your internet's also down, that's our problem — give us a ring.
Almost always yes. Number porting from another provider takes 1–6 business days and is free. We'll keep your old line live until the new one's ready, so there's no gap. Just send us your current account details when you sign up.
No — VoIP runs over your internet, which dies when the power dies. That includes 111 calls. If anyone in your household relies on a landline for medical alarms or has vulnerable-customer status, keep a charged mobile handy as backup. We can also supply a UPS that keeps your phone and internet running for up to 12 hours without power — ask us if you'd like one.
Let us know your new address ideally 2 weeks ahead. We'll check what's available there (fibre, wireless, both) and book the install for the day you move in or shortly after.
If you're moving out of our wireless coverage area, we can usually still do fibre nationwide.
Email or call with 30 days' notice, no exit fee, no contract penalties. If you're moving to another provider that needs your number ported, tell them you want to keep it and they'll sort the port with us.
If you're cancelling because something's not working for you, please tell us why first — we might be able to fix it.
We own the dish and the equipment. If you cancel, we arrange a quick visit to remove it (or sometimes leave it for the next tenant if they're signing up too). No charge either way.
Real Kiwi team in Gisborne, no offshore call centre. Most calls answered in under a minute during business hours. Support 7 days a week, 8am–8pm.